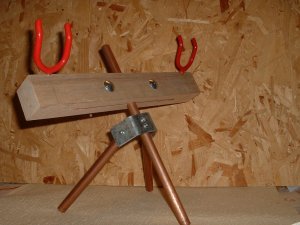
This tripod rod rest is probably the project that you have to be a bit more proficient in DIY to
make successfully on the first go.On the other hand,it does make a very good quality product for very little outlay so it
might be worth having a bash.
What you'll need is 3 lengths of pipe or tube at whatever length you like your rest to be,4 foot,5
foot,6 foot,and leave one leg around 8 inches longer than the other two.Use either dowelling or whittled down wood in 3 inch
or so lengths to bung the ends of all the pipes.
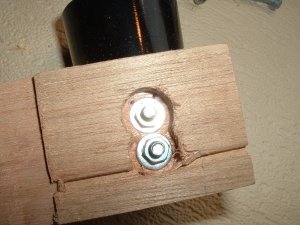
You'll need a piece of sturdy metal plate around 2" by 4".In this case a piece cut from a galvanised
metal rhone bracket.
A few small nuts and bolts,4 large 4" bolts with wingnuts,4 pieces of wood,preferably hardwood,around
14" long,2 " deep,and 3/4 inch thick.I got these ones from a joiner's workshop as scrap.
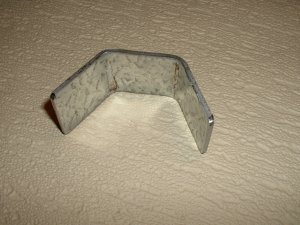
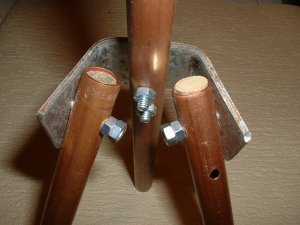
To start with,bend your plate into the shape shown in the first picture,and drill 4 holes to suit
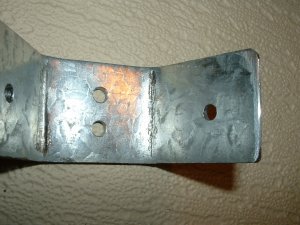
your bolt sizes in the sides and front of the plate as shown in the second picture.
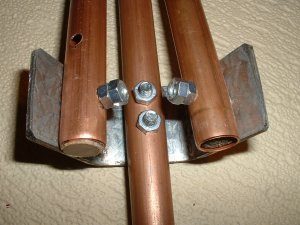
Bolt through the legs as shown,using 2 counter turned nuts on the side plates to allow movement.Use
your longer leg on the front of the bracket,and remember to lock this one solid,and leave the extra 9 inches protruding.
This should leave you the basic tripod shape,with the legs able to fold in and out.
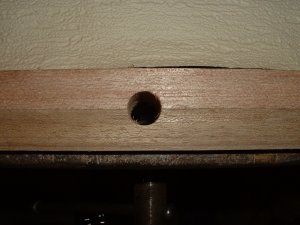
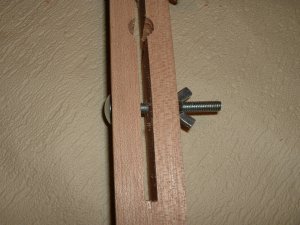
Next take 2 of your pieces of wood,clamp them together flush in a vice,mark and drill a hole 1 or
2mm larger than your pipe diameter,dead centre of the two pieces of clamped wood.The pipe must be able to slip up and down
in this hole,and you should now have half a hole as it were in each piece of wood.
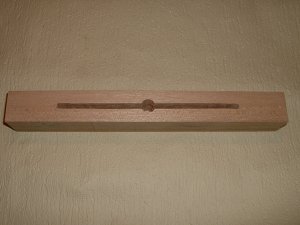
Should now look like this.
Now the trickiest bit.We need to make a slot along the centre of the wood.Take the wood out of the
vice.If you are familiar with a router,rout out 1/8 of an inch,in from 2.5 inches from each end,of each piece of wood,(you
can do this with small saw cuts and clean out with a chisel if you are carefull),and screw the two pieces of wood back together
permanently.You should now have a solid piece of wood as shown.
If you can't manage this for whatever reason,leave the two bits of wood with just the centre hole,and
when you screw them together,use washers on the screws between the wood to keep the 2 wood parts at least 1/8 apart.
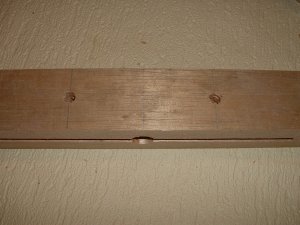
Now drill two holes to suit your large bolts around 2 inches each side of the main hole.Place your
bolts in these holes and screw up your wingnuts with washers from the opposite side.This should have the effect of squeezing
the slot shut.
This will eventually be how you grip your rod rest onto your rod leg.You need two of these completed
wood pieces,but do not fix the second one together yet.Do the routing and leave it.
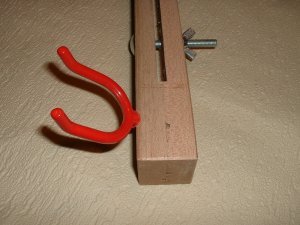
Look around your local hardware shop for tool hooks for the garage.I got these two plastic covered
ones in the 99p shop and they're ideal.Screw them into your wood section at an angle to suit your rods.
Your wooden rod holder should now be able to slip over your long rod rest leg and screw up tight
using the wingnuts.I've used only short legs here to photograph easier.
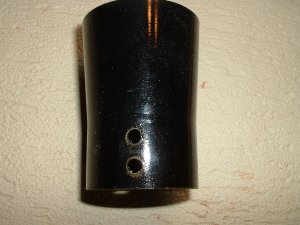
Now you need two plastic cups of some sort to use as butt holders on the bottom of your rest.These
are entrainit cups which you'll be able to get if you know any builders,but any type of plastic cups like large aspirin tubs,large
film tubs,strong plastic lids etc,will do.
Fix them through one piece of your second piece of assembled wood,and now fix the pieces of wood
together,which will hide the nuts.
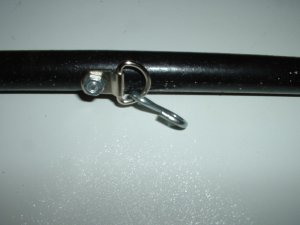
As a final touch,to stop your legs scooting apart on slippy ground,bolt through a small 'D' ring
on each leg,and fix an 'S' hook to each one.Squeeze up the 'S' hooks to stop them coming off,and use a piece of light chain
to slip over the hooks.Do not squeeze the hooks onto the chain as you'll be able then to adjust the length of chain to allow
for how apart you want your legs to be depending on conditions.
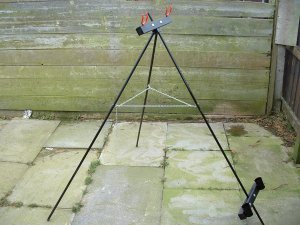
And finally your finished painted rod rest will look like this with top and bottom rests in place.You
don't really need the bottom one of you don't want to.